#How To
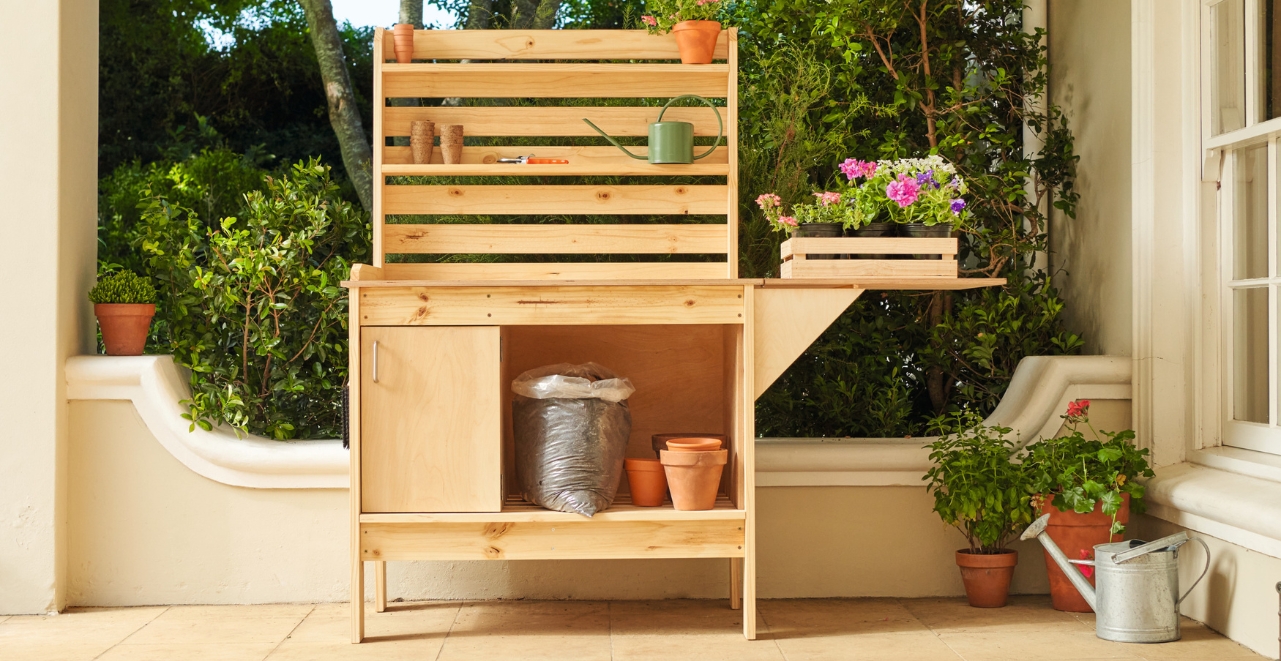
How To Build A Gardener’s Potting Bench
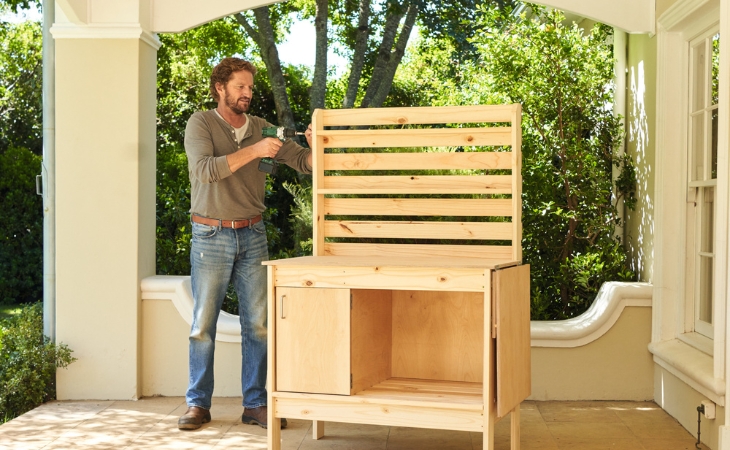
At a working height that is not back-breaking, many tasks can be carried out on with our DIY potting bench. And, if more space is needed or if two people want to work together, the fold-out side part provides an additional 60 cm of work or storage space. On the practical shelves on the rear wall, the required utensils are ready to hand and await their use. After the work is done, soil or plant residues can be quickly and easily disposed of in the integrated garbage can behind the door. This potting bench has it all!
Project Materials:
Use sturdy coniferous wood such as pine. For durability, apply a wood oil or varnish to the timber once finished. This will also accentuate the grain particularly well.
This potting bench is 160 cm high, just under 100 cm wide and has a working height of approximately 90 cm; however the dimensions can be adjusted individually if required. The door, side and rear panels are made of weatherproof glued multiplex boards that are best cut to size at a DIY store.
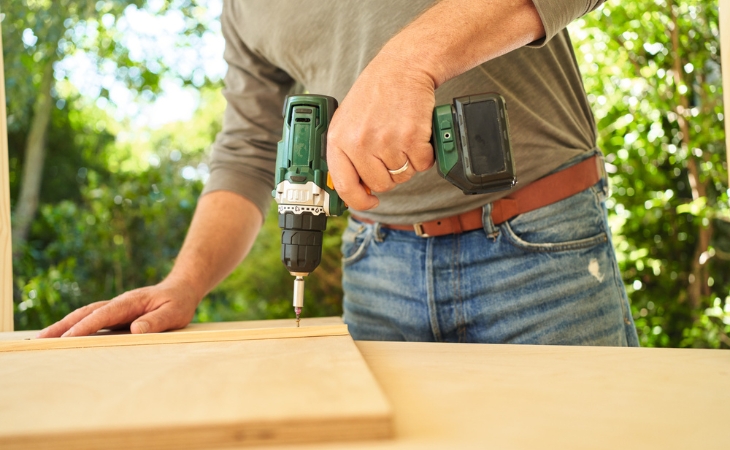
Pre-drill all screw holes if possible. While this adds an additional step, it will prevent the possible splintering of the wood.
Slats for the two frame side parts in “h” shape:
- 2 x 1,600 mm x 94 mm x 24 mm
- 2 x 880 mm x 94 mm x 24 mm
- 3 x 550 mm x 94 mm x 24 mm (including 1 cross piece for center panel)
- 4 x 950 mm x 94 mm x 24 mm to connect the two lateral frame parts
Two shelf boards:
- 2 x 950 mm x 94 mm x 24 mm
Slats for the back wall:
- 7 x 998 mm x 80 mm x 18 mm. Saw a spacer of 28 mm from a suitable piece of wood.
Slats for the bottom:
- 6 x 950 mm x 80 mm x 18 mm
Lateral mud trap:
- 1 x 530 mm x 44 mm x 22 mm
Box glide bars and stop bar for the center board:
- 3 x 550 mm x 44 mm x 22 mm
Equalizing bar for the folding table:
- 1 x 600 mm x 10 mm x 10 mm
Worktop / fold-out side panel made of 15 mm multiplex boards:
- 1 x 1,034 mm x 620 mm
- 1 x 586 mm x 620 mm
2 side panels and 1 middle panel made of 15 mm multiplex boards:
- 2 x 550 mm x 474 mm
- 1 x 550 mm x 568 mm
Back panel made of 15 mm multiplex board:
- 1 x 950 mm x 474 mm
Support triangles from 15 mm multiplex board:
- 2 x 270 mm x 270 mm (flank length)
- Door made of 15 mm multiplex board:
Additional items:
- Plastic container 42 cm x 30 cm x 23 cm
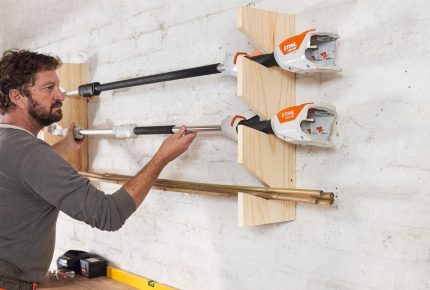
- Screw-on hooks for small appliances
- Wood preservative oil or varnish and brush, if desired
- Magnetic catches for the door (DIY store)
- Door handle
Screws:
- 44 pieces 4.5 x 75 mm for the frame parts and the shelves
- 88 pieces 4.0 x 40 mm for the slats and the worktop
- 18 pieces 3.0 x 12 mm for the hinges in door and triangles
- 18 pieces 3.0 x 30 mm for the hinges in frame and middle panel
Hinges:
- 8 pieces 65 mm x 40 m
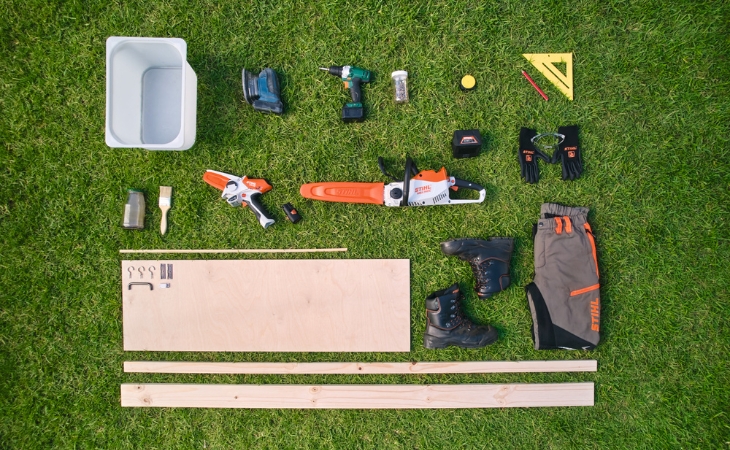
Tools and PPE (personal protective equipment):
- Chainsaw such as the Stihl MSA 140 C for frame boards
- Garden pruner such as the GTA 26 for slats, box glide bars and the mud trap
- Grinder
- Drill
- Spirit level
- Marking pen
- PPE: Cut protection and work gloves, safety goggles, chainsaw boots, cut protection trousers; dust mask if grinding in closed rooms
STEP-BY-STEP GUIDE: Prepare the materials
Step 1: Measure
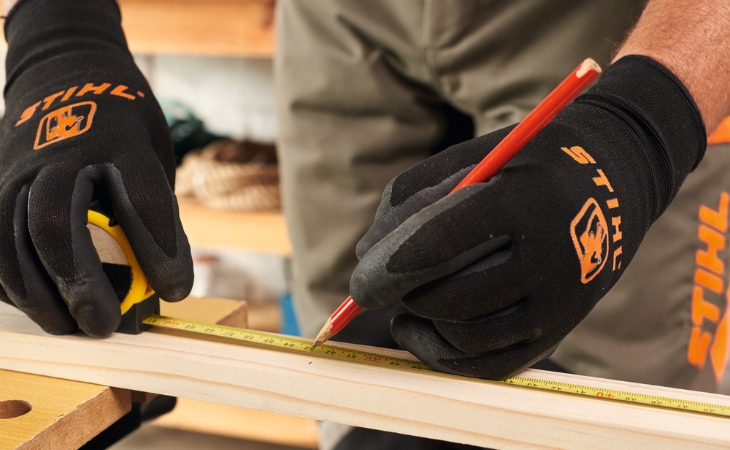
Fix and measure the slats for the upper back panel and the bottom of the workbench: Seven times 998 mm x 80 mm x 18 mm for the back panel and six slats with 950 mm x 80mm x 18 mm dimensions for the bottom. Then measure the slats for the box glide bars, stop bars and equalizing bars, and the side mud trap. When marking the cutting
points, remember that the GTA 26 garden pruner and the 140 C cordless chainsaw have a cutting width of approximately 5 mm.
Step 2: Cut the slats to length
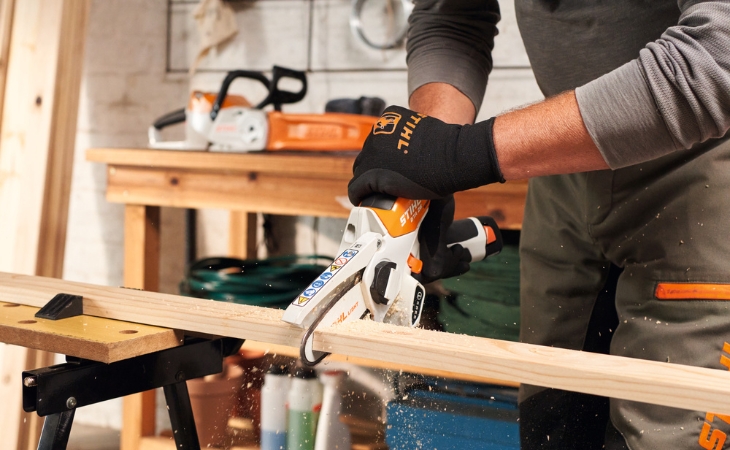
Now, saw the slats to length according to the marking you have made with the GTA 26. Then remove the battery from the appliance and wipe the guide bar clean with a cloth. Before you put the GTA 26 aside, put the chain scabbard back on.
Step 3: Measuring the boards for the frame
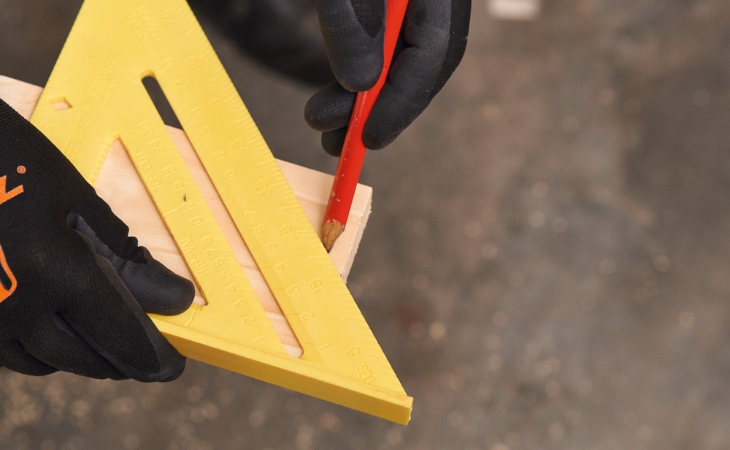
Measure the boards for the side frame parts and their joints. The upper ends of the 1,600 mm long supports are beveled at a 45° angle. This will look better and mitigate the corners.
Step 4: Cut, grind and oil

Using your chainsaw, operate the chain at low speed before guiding it to the wood and then slowly increase the speed. A clean cut is more successful when the claw bumper touches the workpiece. Grind the edges and roughen the entire boards with 120-grit sandpaper so that wood preservative oil or stain can be better absorbed. A dust mask is necessary when sanding indoors. Then apply the oil and let it dry. This may take several days depending on the manufacturer and the information on the packaging.
STEP-BY-STEP GUIDE: assembly
Choose the location for your potting bench before you assemble it to avoid moving it afterwards.
Step 5: Screw the frame
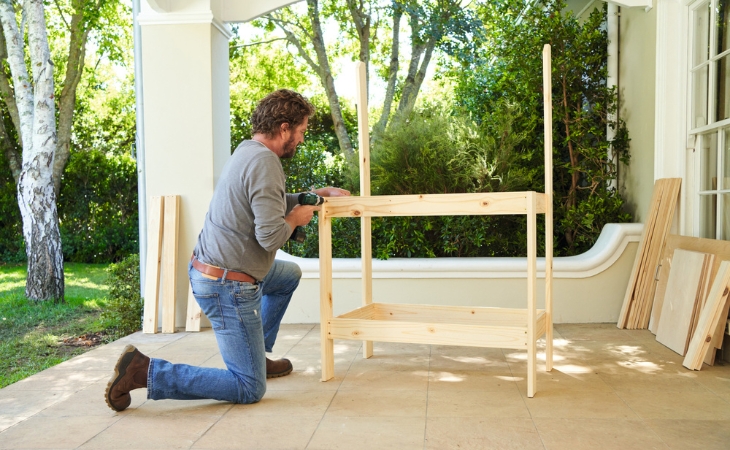
First screw the two side parts together with 2 screws 4.5 x 75 mm per side so that they each form a kind of “h”. Attention: The left and right sides are assembled mirror-inverted. Using the 4.5 x 75 mm screws, screw the two “h” parts to the four 950 mm long boards and set the now created basic framework of the potting bench upright. Screw the 550 x 94x 24 mm cross piece as a support for the center panel between the upper horizontal frame parts. The distance to the left edge of the frame is 28 cm.
Step 6: Fix the bottom boards
Fix the six bottom boards (950 x 80 x 18 mm) each at a distance of 2.8 cm apart on the frame using the 4.0 x 40 mm screws. Regular spacing is easily achieved with a spacer that you saw to size from scrap wood.
Step 7: Attach the side panels and box glide bars

Screw the left side panel to the inside of the vertical piece of wood of the left “h” piece using 1 screw 3.0 x 30 mm per corner. At a distance of 33 cm from the left side panel, screw the stop bar to the bottom boards using the 4.0 x 40 mm screws for the center panel. The center panel is now screwed to this and to the cross piece of the frame. Also use the 4.0 x 40 mm screws for this.
Use the spirit level to mark the place for the two box glide bars: Their lower edge has a distance of 31.5 cm from the bottom in each case. Screw the slats tight.
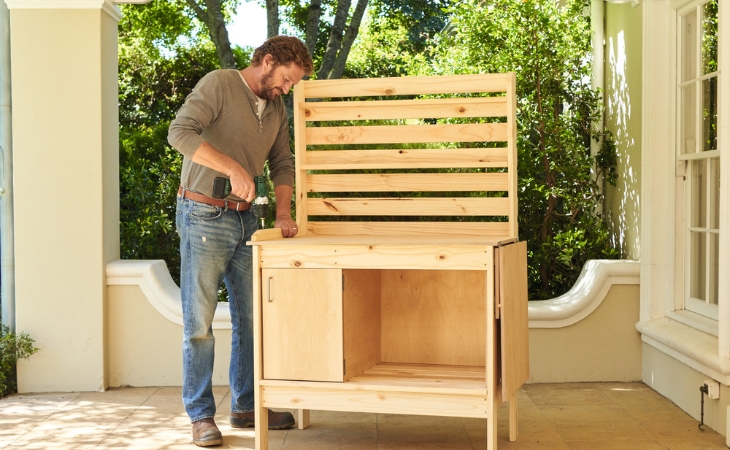
Step 8: Worktop and hinges
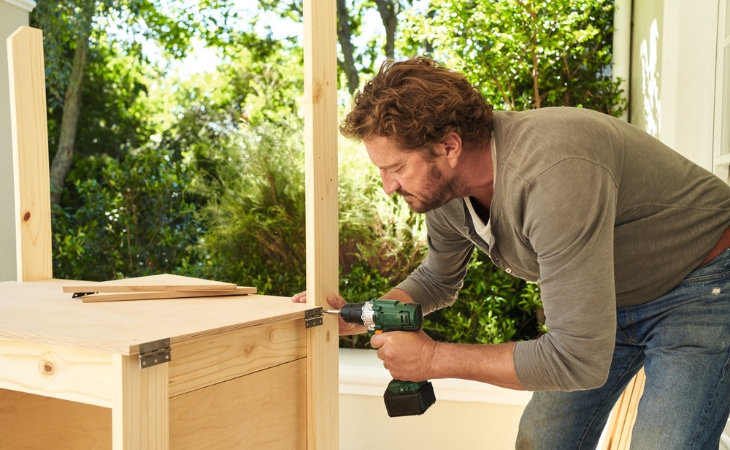
Now attach the rear panel and the right-side panel as well as the worktop. Screw the two hinges for the fold-out panel to the worktop using the 3.0 x 12 mm screws to the worktop.
Step 9: Support triangles
Screw two more hinges per triangle to the two triangles with the 3.0 x 12 mm screws and then fasten them to the frame with screws of the same size.
Step 10: Fold-out worktop
Screw the equalizing bar onto the fold-out worktop with two 3.0 x 12 mm screws, approximately 24 cm from the edge. The bar ensures that the worktop will later lie horizontally. Fold in the two triangles and attach the fold-out worktop to the hinges.
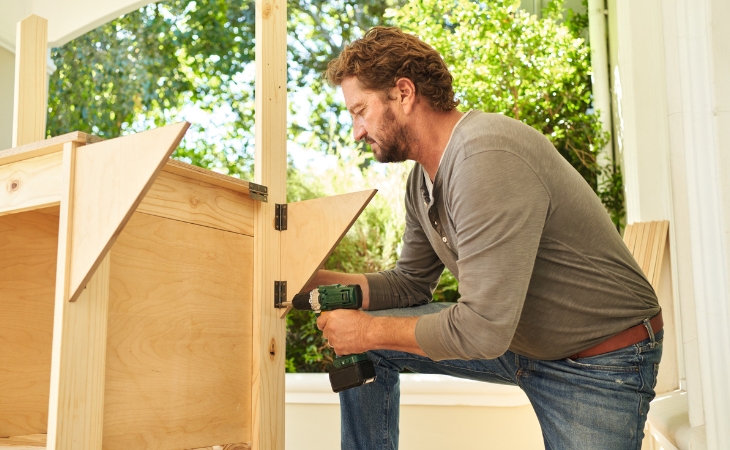
Step 11: Door, back panel and shelf
Attach the door handle to the door plate, as well as the magnetic catches. Then screw the door to the center panel with two hinges and the 3.0 x 12 mm screws. Now attach the seven slats with the 4.0 x 4.0 mm screws for the upper rear panel at a distance of 2.8 cm. It is best to again use the spacer that you already used for the bottom boards. Screw the two shelves in place from the outside through the frame.
Step 12: Mud trap & accessories
Fix the mud trap for the left side firmly to the worktop from above with 2 screws 4.5 x 75 mm. The hooks for the hand shovel and hand brush can now also be fixed with the appropriate screws. A good place for this is, for example, on the left side panel.
Step 13: Working
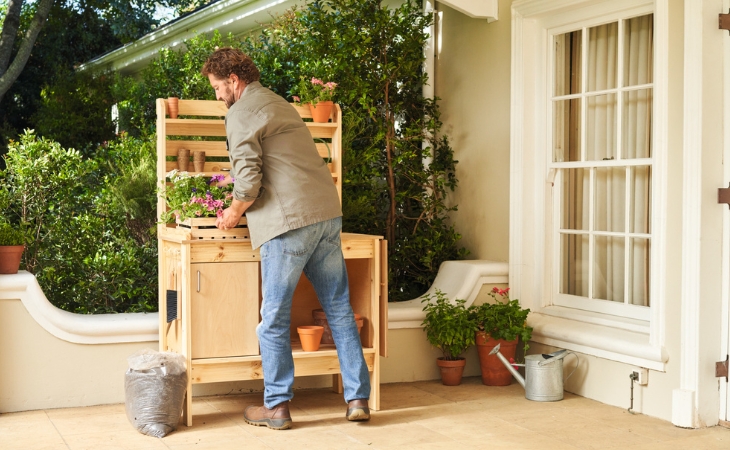
You almost got it – now push the waste bin onto the box glide bars. Then you can use the potting bench to pot or repot or plant out to your heart’s content at a back-friendly working height of approx. 90 cm. Not enough space? Simply fold up the additional worktop and place it on the folded-out support triangles.
You can dispose of soil residues immediately in the waste box: open the door, pull the box forward and sweep the soil into it.
Related