#How To
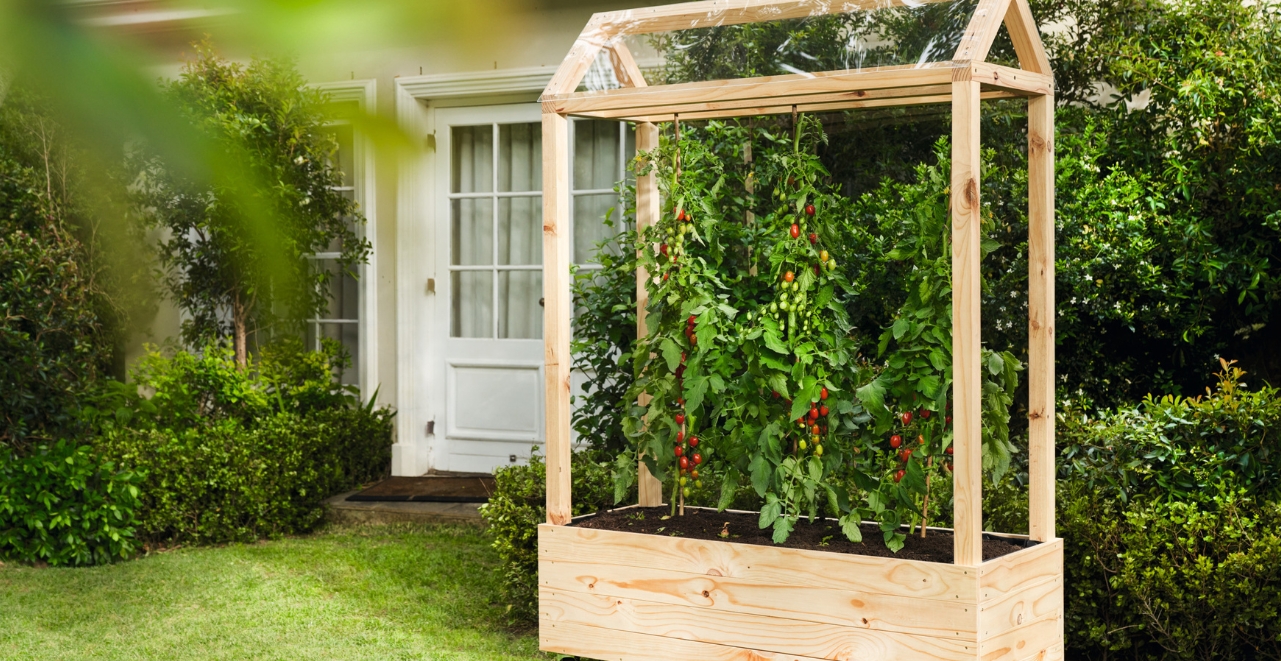
How To Build A Tomato House
Nothing compares to tomatoes from your garden. However, growing them is not without its challenges, as this delicious fruit vegetable, which originally comes from South America, likes it warm and sunny. A small greenhouse is ideal for these sun worshippers and offers them perfect growing conditions.
Another advantage is that in potting soil instead of normal garden soil and in a dry location, tomatoes grow better and are not as susceptible to pests such as root lice or the cork root disease. Furthermore, the dreaded late blight, which is transmitted via rain and by fungal spores in the soil, has hardly a chance thanks to the tomato house. Thus, nothing stands in the way of a rich harvest!
Material and tools
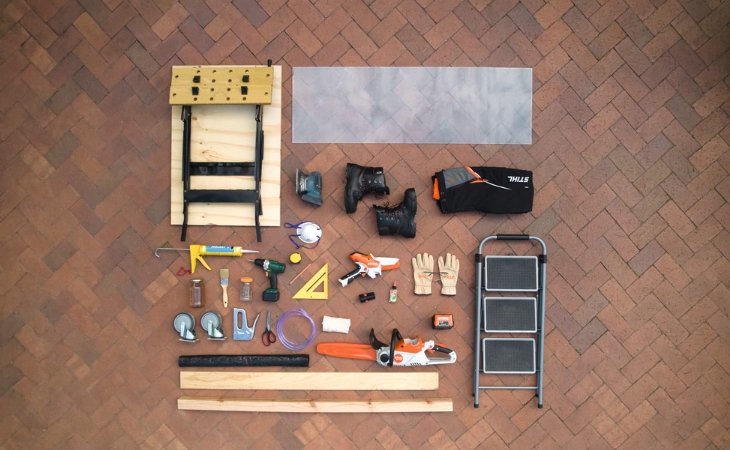
Tools
- GTA 26 battery garden pruner
- Chainsaw such as the new MSA 70
- grinder
- Drill with appropriate bits for the screws
- Drill for wood (optional)
- Stapler / tacker
- Screwdriver
- Secateurs
Accessories
- Workbench
- Angle ruler, set square, etc.
- Pencil
- Measuring tape
- Brush
- Wood oil or wood stain
- Rags
- Step ladder or step stool
Material
- Furniture rollers (50 mm diameter, 2 with brake, 2 without brake)
- Hole drill (12 mm diameter)
- Hose, 10 mm diameter, approx. 1 m of length (for example for aquariums, from the pet
shop) - Silicone (for outdoor use)
Screws
- 12 x 120 mm
- 12 x 100 mm
- 82 x 50 mm
- 16 x 20 mm
- 36 x 15 mm round-head
Boards and plywood for the planter box
- 8 x 1,500 x 100 x 18 mm (long side)
- 8 x 564 x 100 x 18 mm (short side)
- 1 x 1.464 x 564 x 18 mm (bottom plate, cut to size in the DIY store)
Squared lumber (posts) for roof and gable
- 4 x 1,680 x 57 x 57 mm
- 2 x 564 x 57 x 57 mm
- 4 x 1,464 x 57 x 57 mm
- 2 x 340 x 57 x 57 mm (gable, with miter of 45 degrees)
- 2 x 400 x 57 x 57 mm (gable, miter of 45 degrees)
Perspex (acrylic glass)
- 1 x 1,464 x 1,355 x 2 mm (back wall)
- 2 x 1464 x 450 x 2 mm (roof)
Foil
- 1 x 2,500 x 1,500 mm, rubber or unplasticized pond foil
PPE (Personal protective equipment)
- Protective gloves
- Safety glasses
- Cut protection shoes
- Cut protection trousers
STEP-BY-STEP GUIDE Prepation & assembly guide
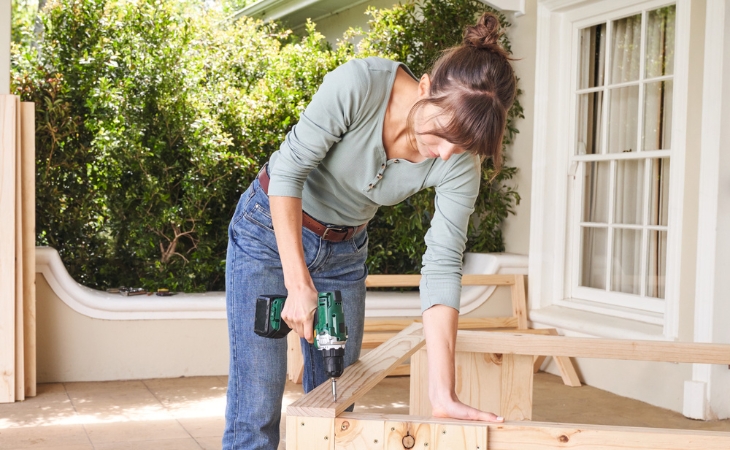
First, prepare the necessary material and equipment in the workshop and you’re ready to go. Start by cutting the boards for the planter box; a small, lightweight cordless pruner such as STIHL’s GTA 26 is ideal for this. For the larger posts, a more powerful cordless chainsaw, such as the STIHL MSA 70, is more appropriate.
Step 1: Measuring and cutting to size
Fix the boards on the workbench and measure the required lengths: 8 boards with a length of 1,500 mm and 8 boards with a length of 564 mm must be available at the end. Now cut the boards accordingly with a clean, smooth cut using the cordless pruner.
Step 2: Cutting posts for the gable
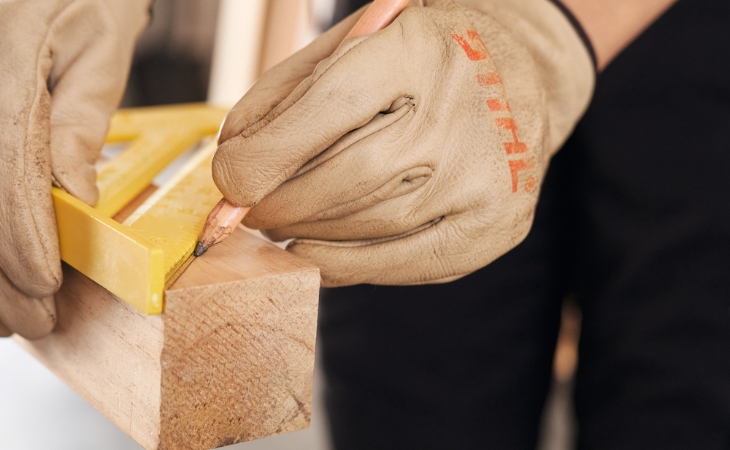
Now cut the posts for the roof. Use a chainsaw such as the STIHL MSA 70 cordless chainsaw to do this. Clamp the squared timber, measure the appropriate lengths and saw the posts to fit. For the posts for the gable, mark a 45-degree angle on one end with the angle ruler. Use a smooth, clean cut to saw first the miter and then the squared lumber to the appropriate length: you will need two pieces 340 mm long and two 400 mm long. The length is measured from the tip.
Step 3: Smoothing cut edges
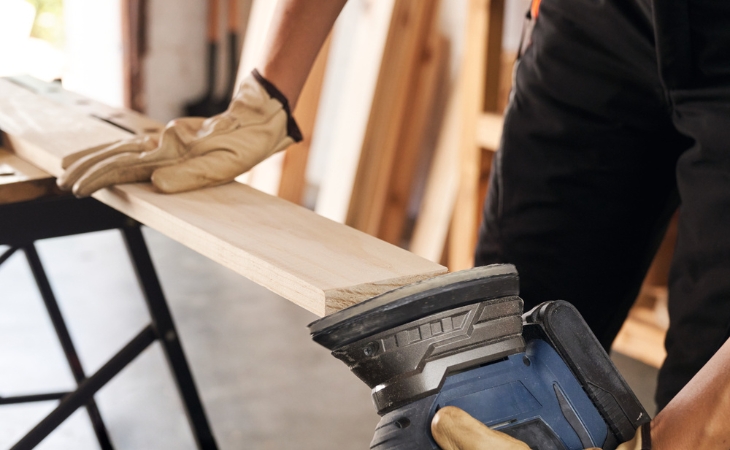
Grind all cut edges smooth with a manual grinder (such as a cordless grinder) or by hand with sandpaper so that no splinters or wood fibers are left over that you could injure yourself on later on.
Step 4: Applying oil or varnish
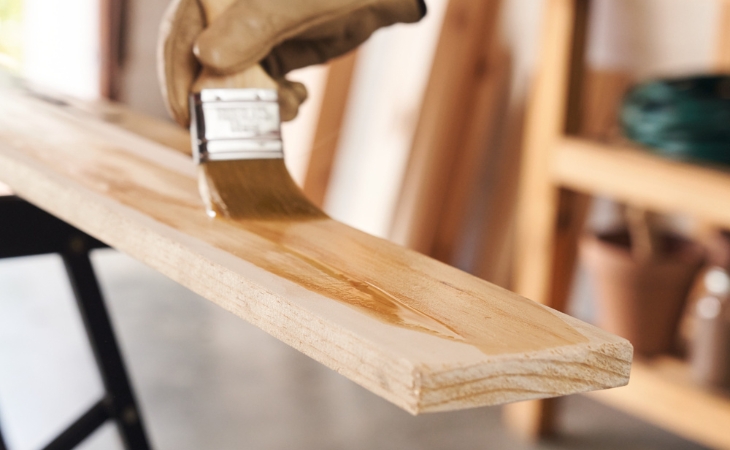
To ensure that the tomato house is later protected from the weather, moisture and fungal or pest infestation outdoors, treat it on all sides and at the cut edges with an environmentally friendly wood glaze or wood oil. Allow the glaze or oil to soak in well and dry thoroughly according to the manufacturer’s instructions before you start assembling.
Step 5: Assemble roof frame
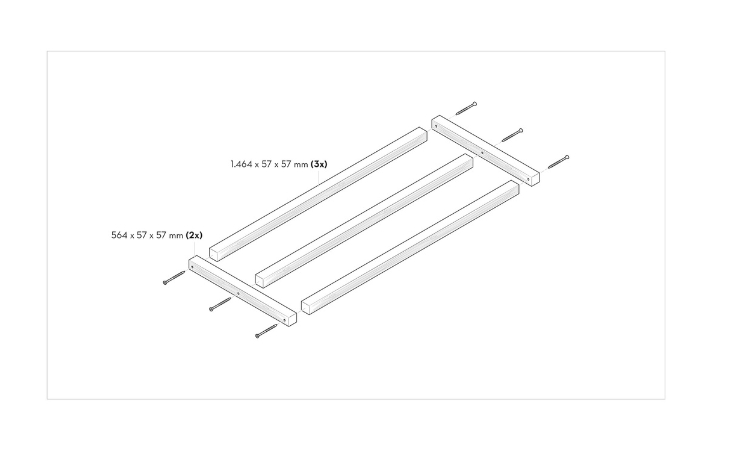
Start with the roof structure and screw three of the 1,464 mm long squared lumber pieces to two of the 564 mm long ones to form a rectangle. To do this, you will need six 120 mm screws – one on each side of the long-squared lumber. To prevent the wood from cracking, you should pre-drill these and all other screw holes (especially those for the large, long screws) with a wood drill. Do not tighten the screws immediately, but only after all the squared lumber has been screwed together. This will prevent the frame from distorting.
Step 6: Building the gable
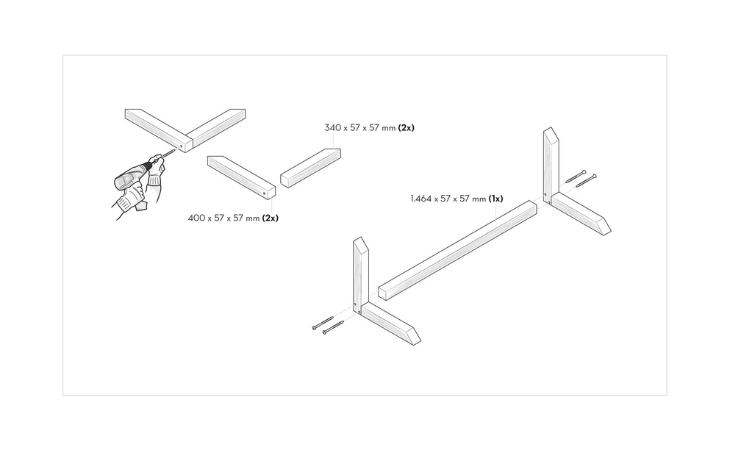
Next, the gable is made, which is placed on the roof: For this purpose, one 400 mm and one 340 mm long squared lumber are screwed together with the angled ends. The two gables are then attached to the last of the four 1,464 mm long squared lumber members. You will need a total of six screws with a length of 120 mm.
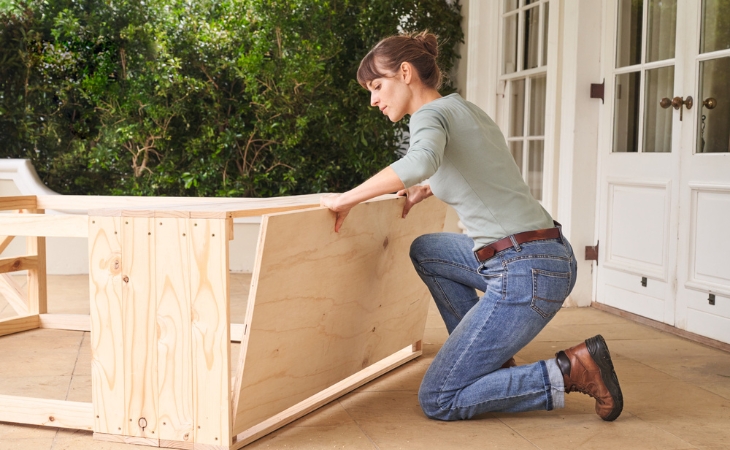
Step 7: Planter box 1
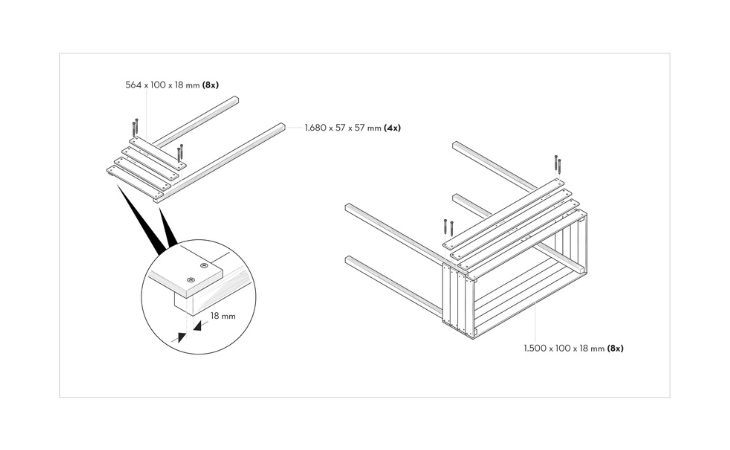
Now proceed with the planter box. Start with one of the narrow sides. To do this, you will need two of the 1,680 mm long square timbers, the eight short boards (564 x 100 mm) and 32 screws with a length of 50 mm. Connect the long-squared lumber to four of the short boards: To do this, first screw the bottom board to the squared lumber so that it protrudes 18 mm beyond the end of the posts. This protrusion will later cover the bottom board with a gauge of 18 mm. A small piece left over from sawing serves as a spacer. Then fix the remaining three boards to the posts without spacing them apart. Each board side is fixed with two screws. Make sure that the screws are drilled with the same spacing everywhere, so that later an even appearance is created.
When the first side part is completed, assemble the second in the same way.
Step 8: Planter box 2
Place the two side pieces upright so that you can screw on the long boards that complete the planter box. Proceed in the same way as for screwing the boards to the narrow sides; here, too, you will need another 32 screws 50 mm long. Start with the bottom board, which is also screwed to the post with an 18 mm overhang, before attaching the remaining three boards. Now tilt the whole construction to the other side to also connect the last side with the boards.
Step 9: Fixing the roof frame
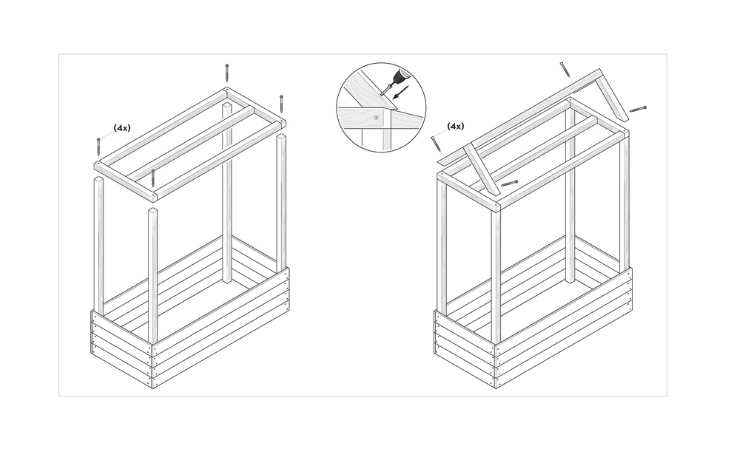
Now position the tomato house and screw the roof frame to the vertical posts with four 100 mm screws. In order to get to the screws easily from above, climb onto a step ladder or a step stool. Make sure that it is stable and does not wobble.
Step 10: Attaching the gable

Now the roof gable is placed on the frame and screwed on. For this purpose, use four screws of 100 mm length, which are screwed in at right angles to the roof pitch.
Step 11: Screwing on the bottom plate
Gradually, the tomato house begins to take shape. To screw on the base plate, however, lay it on its side once again. Place the bottom plate in the gap and screw it to the vertical posts from below with four screws (100 mm long). To prevent the bottom plate from bending downward later due to the weight of the soil, fix it to the bottom boards from the side with 18 screws 50 mm long – seven each on the long sides and two each on the short sides. You can screw these smaller screws into the wood without pre-drilling if you use self-tapping screws such as Spax screws.
Step 12: Screwing on the bottom rollers
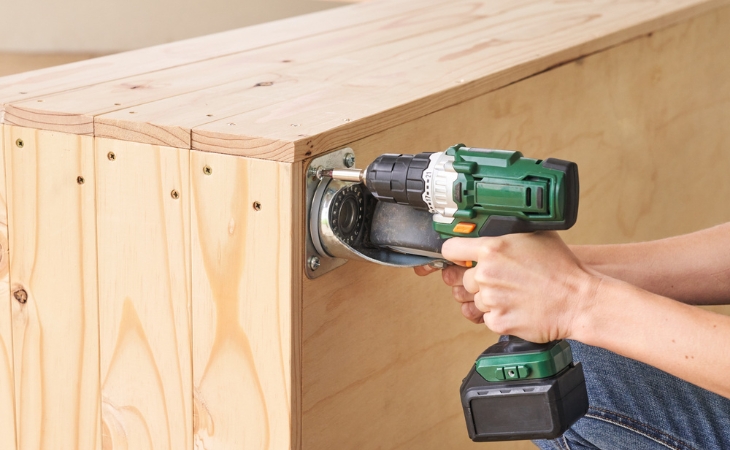
Now the four bottom rollers are screwed on. You will need 16 screws (20 mm long) for this. The two rollers with brakes are attached to one of the narrow sides, the other two rollers without brakes to the other narrow side. Then drill about 30 to 40 holes in the base plates with a hole drill (12 mm diameter) so that excess water can drain off later and no waterlogging occurs.
Step 13: Laying pond foil
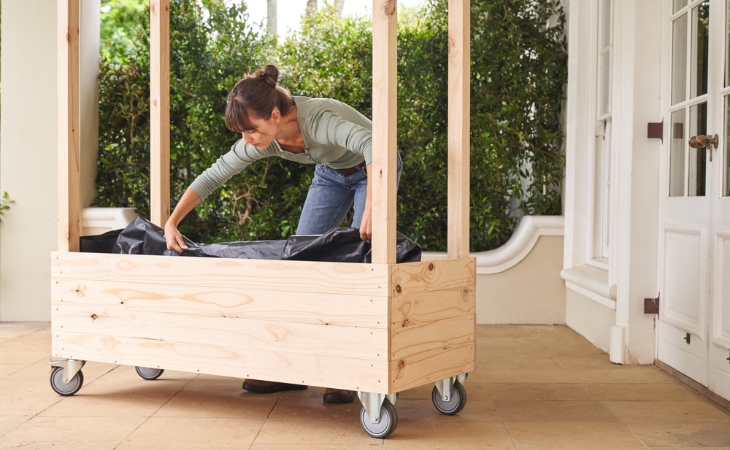
To make the planter box last, line it with pond foil from the inside. Tip: Place the foil briefly in the sun before installation. Then it warms up, becomes soft and is easier to process and fold. Fold the foil over at the upper edges and staple it in place with staples at intervals of 10 to 15 cm.
Step 14: Drain holes
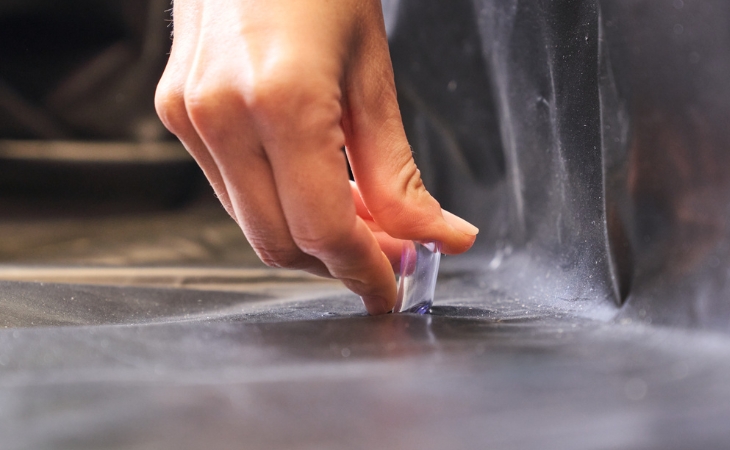
Then, using a screwdriver, drill holes in the foil at the points where there is a drain hole, through which you then insert the tube pieces cut into lengths of about 20 mm.
Step 15: Fasten the roof and the back wall
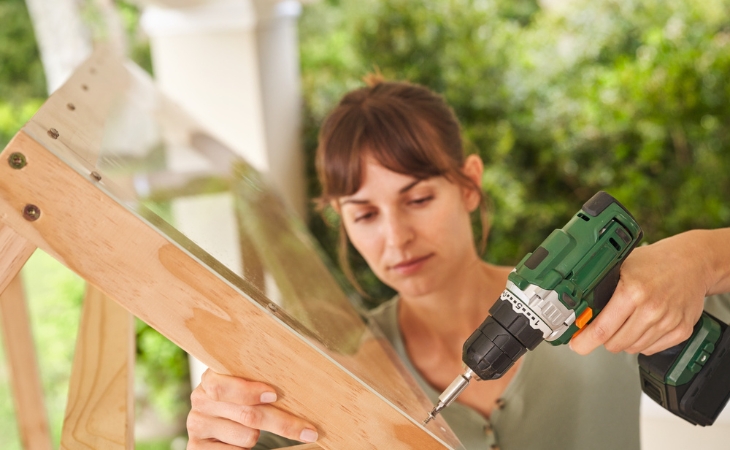
Nearly done! Now the roof and the back wall are added. The roof protects the delicate tomato plants from rain, the back wall from wind and drafts. Tip: Be sure to pre-drill the holes for the screws with which the Plexiglas is screwed to the wooden structure, otherwise the plastic will crack. A sharp wood drill is best suited for this purpose. When all the holes have been pre-drilled – 3 on each of the gable sides, and another 4 along the ridge edge – the two 450 m wide acrylic glass sheets are screwed onto the roof. Proceed in the same way for the back wall. It is enough to drill 6 holes on each of the vertical sides and 4 on the upper horizontal side under the roof. You will need a total of 36 round-head screws (15 mm long) to fasten the 3 acrylic glass sheets.
Step 16: Sealing
Finally, seal the ridge with silicone to prevent rainwater from getting between the acrylic glass and the timber.
Done – the greenhouse is set up!
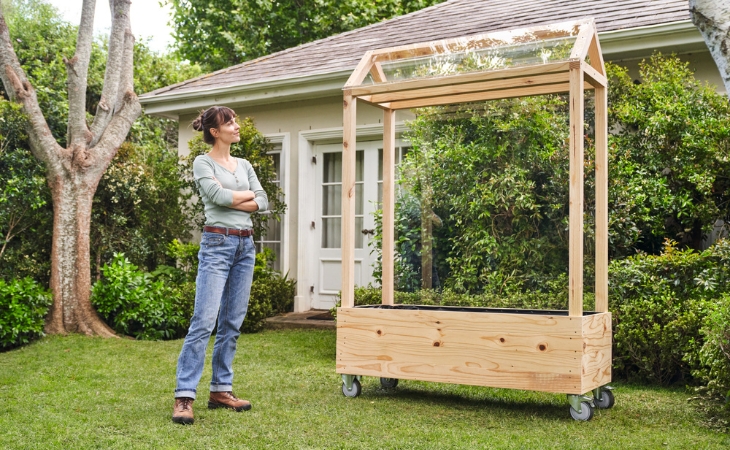
When the silicone has hardened, you can put the tomato house in its place in the garden, fill it with soil (approx. 280 – 300 liters for the dimensions used here) and plant it.
Related